DirtyGirl's Kawasaki ZXR 250 CarburetorsThe process of cleaning the carbs on my Kawasaki ZXR250 has been long and involved, to say the least. Even knowing, as I did, that carburetors are a very complicated and delicate system of parts, I was still amazed at the intricacy of the parts and the variety of materials involved. As a rider I thought of carburetors as an aluminum part, but when you start doing mechanics work and you take a carburetor apart, you discover brass, nitrile, plastic, anodized aluminum, and some of the parts it was hard to tell at first because they were so dirty. The ZXR I bought had been stored, shipped, run briefly and stored again, and the debris and sludge in the carburetors was disgusting. I've seen dirty carbs before, but nothing like the colourful assortment of revolting substances inside these carbs. Since all the work I've done to the chassis will be wasted if the carbs don't function well, investing time in getting the carbs perfect was a worthwhile goal, it was just a bit more time consuming than I initially anticipated. | |
|
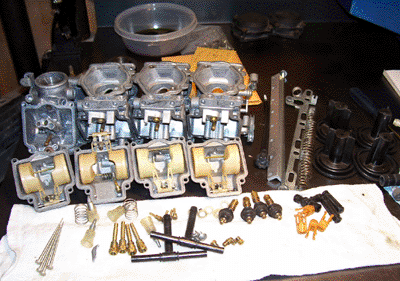
Here you can see all the various little bits and pieces that make up the ZXR 250's carburetors. Almost all the parts required very delicate handling for cleaning. All the o-rings needed to be replaced, but I was only able to source the small round ones shared by other Kawasaki bikes/Keihin carburetors. With very careful cleaning I managed to salvage all the other parts from inside the carbs. The delicate plastic floats, diaphragms and sliders were cleaned with alcohol on cotton swabs. The float-bowl and air-box o-rings were cleaned with mineral spirits and the delicate use of wooden implements for scraping the lacquer-like substance off the o-ring material, then they were soaked in motor oil. The champion cleaning tool in the shop is usually the mineral spirits wash-tank, but for this job it was definitely the sonic tank. The green, brown and black sludge in the float bowls and carb bodies dissolved into flakes, chips and particles in the sonic tank. The black and green encrustations on all the brass jets dissolved and drifted away in the water in the sonic tank. Amazing what heat and vibration can accomplish, that would otherwise require an assortment of toxic chemistry, the sonic tank is my 'green' hero!
|
|
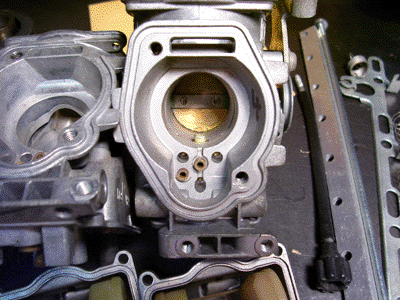
A view here looking into the throat or bore of the carburetor body, towards the butterfly valve. You can see three brass-ball plugged holes, and two brass tubes; the upper tube feeds air to the needle jet, and the side one feeds air to the pilot jet. The complexity of manufacturing a carburetor becomes apparent when you look closely at these parts; tiny brass fittings set into an intricately shaped aluminum casting. To the right of the carburetor body in the photo you can see the idle adjustment screw (with a knurled knob that will be a familiar shape to riders of several generations of Kawasaki bikes). To the right of the idle adjuster is the bracket that holds all four carburetors together, and the link plate for the chokes at the far edge of the picture.
|
|
|
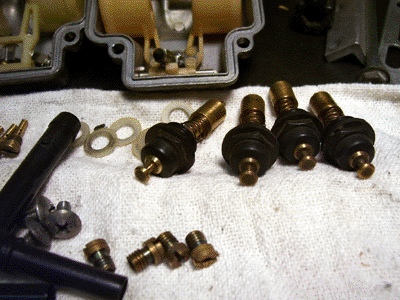
In this photo you can see the four plungers for the choke system, themselves a complicated assembly of different materials, a plastic cover, spring and plunger. This tricky little part took some very careful cleaning, and time in the sonic tank. It wouldn't be impossible to do without the choke mechanism entirely, but my goal was to keep the carbs as close to stock/new as possible. You can also see the nylon washers that go onto the choke plate, to guide the moving parts involved in turning the choke on and off. The black plastic 't' shape is the atmospheric vent (better view below). You can also see the four small main jets, towards the bottom of the photo.
|
|
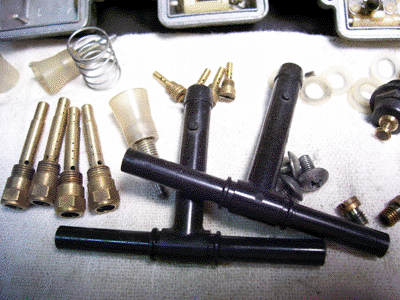
The black plastic 't' shaped pieces are the atmospheric vent tubes, which needed their o-rings replaced. Above that, you can see four small jets, these are the pilot jets - these were cleaned with great care to ensure the bike idles well. The larger jets to the left of the vent tubes are the needle jets, or an emulsion tube, since these are down-draft carburetors and the needle doesn't go into the jet itself. Brass jets are one of the more precise parts in a carburetor, and one of the hardest to clean thoroughly. The sonic tank allows you to clean out interior spaces with no risk of altering the hole sizes. Cleaning by poking prodding and scraping could damage the jets beyond usefulness. Cleaning them sufficiently to read the tiny markings imprinted on them was an extra challenge.
|
|
|
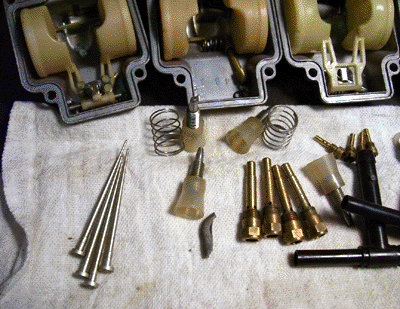
The long aluminum tapered t-shaped pieces on the left are my favorite carb part - these are the needles. Aren't they beautiful? I cleaned them very gently, making sure not to bend or distort their shape. You may have seen needles with grooves for circlips, giving them some adjustability, but the ZXR's needles aren't adjustable. The screws with little cups are the float bowl drain screws, and the little plastic cups just help guide the tool to use them while the carbs are installed in place on the bike. You can also see a small broken bit of aluminum casting, this broke off the edge of the flange that holds the o-ring between the carburetor and the air-box, and the other inside carb has a crack in a similar place, apparently it's a delicate area in the casting.
|
|
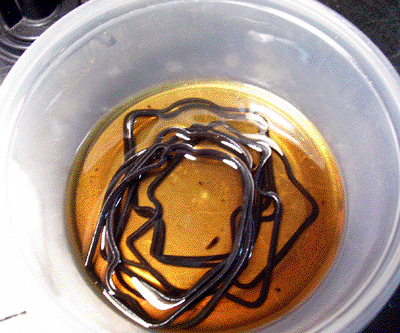
The specially shaped o-rings for the carburetors have proven very hard for me to source, so I've reluctantly decided to reuse the old ones, after carefully cleaning them with mineral spirits and them soaking them in motor oil. The more square looking o-ring is for the float bowl, and the rounder one is the air-box side o-ring. While the long bath in motor oil didn't dramatically improve the texture of the o-ring, I think it helped soften them a bit, and they kept their shape quite well. Fitting them into the groove in the casting on the carburetor body was done very gently to ensure a precise fit.
|
|
|
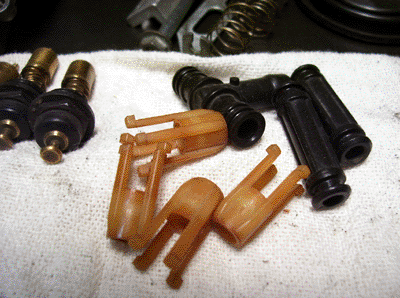
These brown-with-age plastic parts fit over the needle and hold the spring; a spring seat. Compared to the elegant anodized aluminum needle, these critical parts look like bits of old Bakelite washed up at the tide-line. The black plastic parts are the fuel inlet and transfer tubes, and they also needed their o-rings replaced. The two short tubes go between carbs 1 nad 2, and between 3 and 4, and the t-shaped transfer tube goes in the middle.
|
|
I got too distracted by the assembly process, unfortunately, and I forgot to take pictures of each step in the process. Next time I have the carbs apart, I'll get more photos of the assembly process.
| |
|
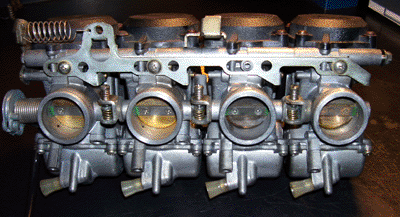
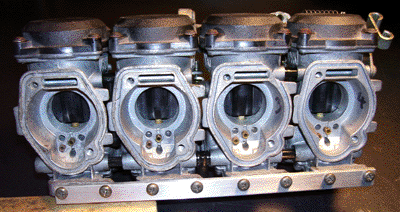
The carburetors are now all assembled, and this view shows the motor side of the carburetors, where they attach to the engine. You can see the float bowl drain screws in place with their little collars all pointing to one side. There are only three screws holding the choke link plate in place, apparently that's how they came from the factory.
|
|
You can see the air-intake side of the carburetor, and how neatly and compactly these carbs fit amongst each other, almost like puzzle pieces. We numbered each carburetor so that we could be sure to assemble them in the same order and they were originally put together.
|
|
|
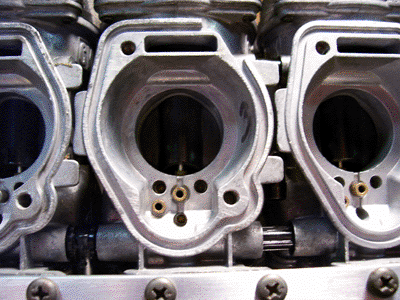
Looking into the throat of the assembled # 3 carburetor, you can see the cracked and broken edge of the flange that holds the o-ring. You can also see the fuel transfer tubes, tucked neatly away underneath the carbs.
|
|
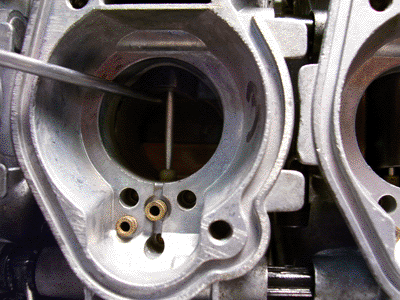
With the carb slide held up and out of the way, you can see that beautiful anodized aluminum needle in the centre of the carburetor. Behind the needle you can see the butterfly valve on the motor side of the carburetor. Assuming these carbs were on the bike, you could open that butterfly and see into the valves. Typical of Kawasakis of this era, it's a 4-valve per cylinder arrangement.
|
|
|
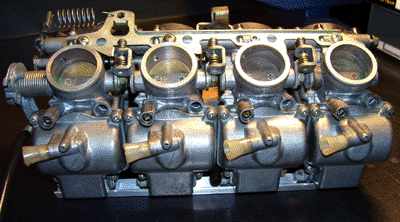
From the underside of the carburetors you can see the float bowl drain screws and above those are the fuel screws, enrichening the rpm range just above idle. Setting these up correctly is delicate work, the brass threads can cut new grooves into the aluminum casing if you cross thread them, and they need to be set precisely to work right. Threads must be cleaned and oiled before assembly to get this step right.
|
|
I've learned a great deal about carburetors in this process, and I enjoyed cleaning all the amazing bits and pieces that together make a carburetor, but the more I learn about them, the more I realize I don't know, don't understand. Riders talk about their 'jetting' like there's just one jet! My respect for the carburetor is growing faster than my comprehension. Back to the books...
| |
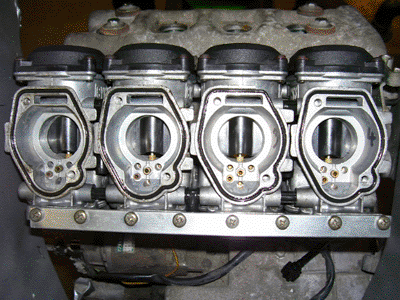
Installation Update:The carbs, complete with their precious, precious o-rings, are now installed on the ZRX's engine. With the help of a blast of hot air to warm up the fitment onto the motor, the carburetors popped into place on the engine. There isn't a lot of room between the slender frame, but it all fits nicely.
|
|
|
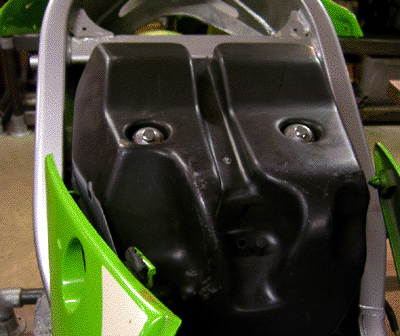
The ZXR's airbox was installed on top of the carburetors, an easy fit but a bit fiddly with the captured bolts in the airbox. My new hand-made air filter fitting snugly within, and seen here all assembled and ready to go. Next project on the list is the exhaust system, the pipes are quite badly corroded, but a careful professional beadblasting and a coat of paint will keep them from getting any more badly pitted. The aluminum silencer seems to be in good condition, and I've got the very fancy gasket required for secure mounting at the engine end.
|
Read more about DirtyGirl's Kawasaki ZXR 250 Racebike projectKawasaki ZXR250 Pages:Original Documentation - OEM Specifications - Race Preparations - Carburetors - ZXR main page
| |
Back to the ZXR 250 Page - Back to the Articles Page

